

So, you want to write? And you’re looking for different tools to make your writing easier, better organized or adopted for a new publishing format?
I’ve published nearly 300 blogs and articles over the last several years, and, while the tools aren’t as important as the time, attention and process your put into writing, I’ve come to like and get pleasure out of certain writing software. These are the tools that put me into writing zen.
Whether you are working on the next great American novel, creating a work report, penning a poem, or just striving to get a shareable blog post published, here are my favorite tools for writing for writers.
This post has been updated and revised. Please checkout Version 2.0 that now includes The Archive and Typora.
My Core Writing Tools
These are the true workhorse tools for my writing: Ulysses, Evernote and Bookends.
Ulysses: Plain Text Editor for Writers of All Types

Solves: Minimalist Markdown Text Editor with a Clean Interface and Export Option for eBooks
When I started writing more in long-form, I need a tool that could better handle this without being too complicated or cluttered. A lot of my writer friends use Scrivener, which is a powerful tool for writers, but after trying Scrivener in the past and more recently, I prefer Ulysses on Mac.
Ulysses is a plain text editor that let’s you write in markdown. Markdown is my preferred input format over text-rich editors like Word. You end up with much cleaner text, and you can then export to the target format and style it accordingly. Ulysses has some nice additions that make it easy to add links, code snippets, footnotes and bibliographic references.
Mainly Ulysses provides a super clean organizational structure and a clutter-free UI. Shortcuts make it easy to show the sidebars when organizing or hide them when focused on writing. You organize your sheets with groups. There are a number of nice subtle additions like word counts and goals, which can be applied to the group as whole or subsections. The circle fills up as you reach your target word count.
Ulyssses is built for Mac, and it also has a nice iOS app too. Your writings are stored and synced in iCloud. So, it’s a seamless experience working on a draft on the computer and then working on it on your phone or iPad.
Ulysses lets you export your manuscript in multiple formats like pdf, Docx (for Word), ePub (for ebooks), and html (for web). You can also export it in markdown or plain text too. The ebook export option looks good by default, but it’s also easy to create your own template and override the default styles.
While Ulysses can work great for all kinds of writings and I may later shift more of my shorter form writings like blogs and articles to the tool, for now Ulysses is where I do my longer writing work for books. Ulysses doesn’t provide as powerful of a research and organization tool as Scrivener, but it’s overall experience and faster performance makes it my favorite tool dedicated to writing.
Evernote: Writer’s Grab Bag and Draft Journal

Solves: Digital Storage for Everything, and Draft Journal from Ideas and Drafts to Publication.
Evernote is My Digital Memory, and, if I had to pick a single productivity tool, this would probably be the one. Evernote basically handles and stores everything I want to collect and remember.
The most powerful yet underutilized feature in Evernote is tagging. If you want to push or adapt Evernote to do something special, most likely tags can make it happen. I’ve written about Evernote a lot, in particular how I’ve used Evernote for GTD and task management, Evernote as a CRM, and Evernote as my article reader. Evernote with thoughtful usage of tags is the primary way I keep my mind organized and my digital life searchable.

For writing purposes, Evernote is the general storage of all my ideas, journals, notes, drafts, quotes, and more. It’s where I plan and do research. It’s where first drafts start for me, where second drafts are perfected, and often where I finish certain pieces of writing too.
For creative writing in Evernote, here’s my setup: I have Notebook dedicated to writings called “Writings (In Process, Drafts, Ideas).” This is where drafts and ideas go. It’s pretty raw stuff, but anything worth a sentence or two ends up there. I do my best to tag these notes with one or two key tags, so, I can’t find something via search, I can locate it through tags.
To better organize my writing process and workflow, I use a few specific tags. My primary ones are: draft-idea, draft-working, draft-working-focus, draft-publishable, and Blog-Published. These five tags cover my workflow process from idea stage to draft stage to publishing. Depending on how you want to draft, write and publish, you can setup an appropriate tagging convention for your needs.
Bookends:
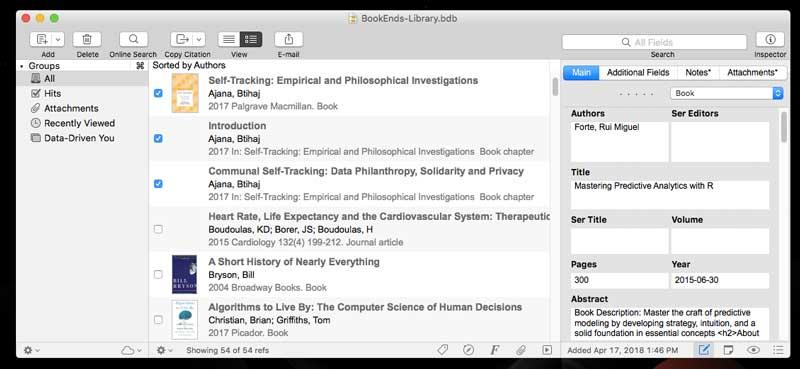
Solves: Find and Store Research References, Generate a Formatted Bibliography
Bookends is an example of reference management software. It’s primary users are academics and researchers, who need to collect and organize their research and to create properly formatted bibliographic information for their publications. There are a number of options in this software category like Papers and Zotero, and plenty of fans of each.
After surveying a few tools, I elected to use Bookends as my reference and bibliography manager. Historically all my primary research, articles and notes has gone into Evernote, and this remains the case today. Evernote can gets a bit cluttered, and it isn’t targeted for the standard of academic papers and research. So, since I’ve began doing and writing more formal research articles and books, I dump all my references, books, articles and internet citations into Bookends.
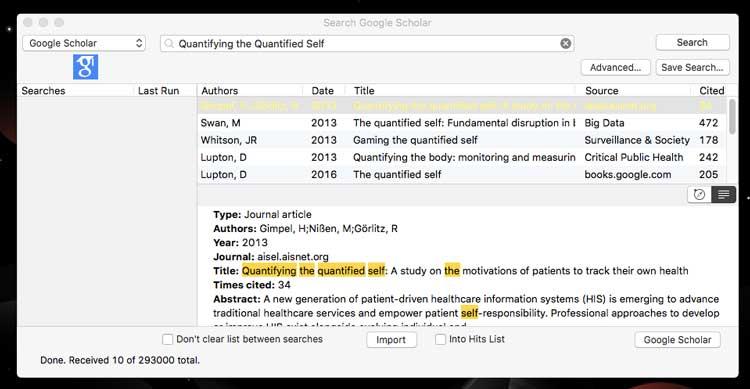
It’s a bit tedious getting started (especially if it’s been over a decade since you left graduate school), and you’ve forgotten how to create a work cited page. Fortunately, Bookends provides default fields so you know what to collect on each article or book. It also has a few nice automation tools. For example, you can import complete book references from Amazon and article and journal citations from Google Scholar, pubMed, or several other academic databases. This can really speed up setting up your initial database of citations.
Once you have added your references, Bookends makes it easy to then export a properly formatted bibliography or works cited. Simply select the articles you are using and then export it. Bookends provides nearly a dozen standard formats by default, and it’s easy to create or adapt your own.
Additionally, Bookends integrates with any number of text editors and tools, so you can create smart references. This makes adding references inside the text you are writing easy. Basically you copy the reference out of Bookends and then paste it as special tag into your text editor. Finally, when you need to render the completed manuscript, the text you wrote is combined with the references you’ve added from Bookends to generate the final text.
Currently I use Bookends with Ulysses to handle references and citations in a book I’m writing. This setup provides another kind of digital memory and significantly improves my productivity too. Later on, I won’t need to retrieve and rewrite all the target references, since Bookends and Ulysses are already in sync.
Bookends might not be a tool for all types of writing, but if you do academic and research style writing, a reference manager is a must-have.
My Design Tools for Writing
I also dabble in a bit of design work. Design considerations go a bit beyond this post, but since I typically create graphics for everything I publish, it’s worth mentioning the tools I use to make it happen. While they are “old school,” I still primarily use Adobe Photoshop and Illustrator for creating graphics and editing photos for my writings. By combining stock graphics, illustrations, and photos, I primarily use Photoshop for my design work. It’s a great tool for editing or creating blog post images and book covers.
Looking back, I’m definitely glad I invested a couple months of study time to become proficient in basic design with Photoshop. These basic designs mean that I can create decent looking images for my needs, and I‘ve saved a lot of time and money too.
Supplemental Tracking and Productive Tools for Writers
While not critical for how and what I write, here are a few more tools that help me to track my writing, to stay productive and organized while writing, and to improve and automate my writing workflow.
Tracking My Word Count with Word Counter for Mac

I’m a bit of an obsessive tracker, and I use a lot of tracking tools. For tracking my writing, I use Word Counter for Mac. It’s a tool that keeps track of my daily word count in different applications. It might be a vanity metric, but I enjoy seeing my previous day’s word count and looking up today’s word count too. As a writer, it’s good to know that I managed to write some words each and every day, and as a dabbler in data science and data visualization, it’s a cool data point to explore.
TextWrangler: Free Plain Text and Coding Editor
TextWrangler is a free plain text editor. You can use it for coding, but in my case, I use it for finalizing and publishing my blog drafts. Most of my writings start in Evernote and then get published using Jekyll, Markdown blogging setup. I use TextWrangler for creating the final markdown file for my blog publications. While there are some really great markdown and text editors out there like Caret, Ii you don’t want to pay for a text editor, TextWranger is one I would recommend you use.
Alfred: Mac Automation Tool
Alfred is a powerful Mac automation tool. If you work on a Mac, you should be using Alfred. Alfred provides a faster way to do various things, like simplifying Web Searches and opening specific documents or applications. There are hundreds of add-on workflows that you integrate different tools and services with Alfred. I describe Alfred as way of bringing command line productivity to the forefront of how you work on Mac.
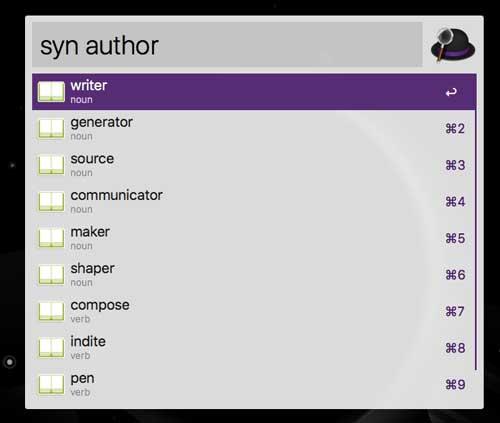
For writing purposes, I use Alfred to make synonyms lookups seamless, query stock images for designs, and to query my daily word counts from Word Counter without opening up another app. (I do this with a custom python script I’ve created).
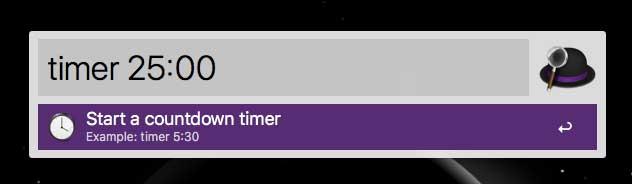
When I’m struggling get going or need a way to simple do a session, I also use Alfred as a simple pomodoro timer. For example, if I want to write for 25 or 35 minutes, before taking a break or walk, it’s a few keystrokes to start a timer like this.
My Key Productivity Tools: Streaks, Todoist, Toggl, and Google Calendar
I believe most work gets done, because we simply show up and do the work. Writing is not really an act of inspiration or waiting for the muses; it’s an act of sitting down and doing it. The best writers have built up the habit of “showing up and writing,” and they do it consistently.

I strive for the same mindset as a writer, and I use a number of techniques and processes to make sure I stick to my habits of writing. I use Streaks app to track the habit itself. I use Google Calendar to schedule dedicated blocks of time in my calendar for writing. I use Todoist to collect all the various writing tasks I need to do to complete a project. I also assign those tasks to a certain date and time so it’s also scheduled to do. Finally, I use Toggl to time track my writing sessions and work as a whole.
All combined these tools ensure I’ve committed time to writing and help me keep track of how and how much I write. The most important thing though is that I commit to writing and carve out time to do it. “Magically,” when I do, words get written, blog posts get published, and chapters in my book advance.
Conclusion: Find Your Tools, But Commit to a Schedule and Focus on the Process
“Amateurs sit and wait for inspiration, the rest of us just get up and go to work.”
― Stephen King, On Writing: A Memoir of the Craft
I’m passionate about writing. While I’ve managed to complete over 300 blogs and articles over the last couple years, I’m still growing as a writer. There are days when the writing goes well, and others where I struggle. Fortunately, I’ve committed to writing as a lifetime activity, and I look at each day as opportunity to show up and put in the time in my craft as a writer.
In this post, we looked at several of my favorite tools for writing. Specifically my two favorites are Ulysses and Evernote. I’ve done a lot of great writing with just those two tools. Beyond those, I use a number of organizational tools that help me stay productive and organized as a writer. For example, I really like my current reference manager, Bookends, and my word count tracker, Word Counter for Mac. They aren’t indispensable, but they sure do improve how I like to write. Additionally I’m a huge fan of Alfred, and a few workflows make web searches and thesaurus look-ups more seamless.
To help me manage my time and writing, I use a number of productivity tools. I believe it’s critical to leverage what you like to manage your time, tasks and calendar. For me, I use Google Calendar to schedule weekly blocks of time for writing, I create tasks in Todoist for writing, planning and design work, and I use Toggl to keep track of my weekly writing time. These are provide consistent reinforce to my habit of writing.
In the end, I encourage you to find your tools as a writer, but don’t procrastinate too much on tools at the expense of avoiding the act of writing. Ultimately what matters most is committing to writing. The best writers have managed to create even before we had computers. Their secret: showing up and writing. So, focusing on the process and keep writing.
Good luck and happy writing!