
Are you facing a never ending pile of articles to read? Have you ever remembered this amazing post you recently read but forgotten the title or URL? Or are you just hoping to augment and improve how you read and learn stuff online using technology?
One empowering approach to reading and learning in the internet age are read-it-later apps. My tool of choice is Instapaper, and with a few additional tweaks, as I’ll go into below, it can be even better.
A read-it-later app enables you to save articles from the web and (surprise, surprise) read them later. They generally give you a better reading experience without all of the ads and distractions too. They are largely intended as a way to capture stuff that comes up while working on one thing, avoid distraction, and read it when it is more convenient.
The three most popular approaches today are Pocket, Instapaper and Evernote. Each of these lets you save articles and then read them offline on a mobile device or computer using their app.
At their most basic, each make article reading experience better and less distracted. Each can also be leveraged to build an external, digital memory of the things you read. You can look back in time and know what you read and when. You can create even a year in reading as I did to see trends. Moreover, when your biological memory slips, you can simply search your archive of saved articles to find the reference or quote that stood out.
As I recount in How to Track the Articles You Read and Augment Your Digital Memory, the two tools I previously used were Evernote and Pocket. Both are good options, but over the last year or so, I’ve become a real fan of Instapaper.
On the surface, Instapaper is extremely similar to the slightly more well-known and popular, Pocket. Not only does Instapaper provide a beautiful and clean reading experience, it gives some empowering extra features, especially if you depend on internet research for your work or studies.
The two features that most stand out for me are highlights and tracking:
- Highlights enable me to mark up important passages as I read them. I use a similar feature on Kindle and for PDFs too. While highlights don’t automatically create memories and learning and in fact we shouldn’t forget that highlighting and re-reading are two of the least effective learning techniques (Dunlosky, 2013), they are a good starting point, since instead of re-reading an entire article, you can just extract the key parts you highlighted. What I often do when I’m researching a new topic is during my initial search, I first save various articles into Instapaper. After that, I read those topic-focused articles in the app and highlight accordingly. Then once I’m ready, I export all of the highlights and use them to summarize in my own words. This is part of my knowledge cycle and my general note-taking technique.
- The other thing I love about Instapaper is its tracking capability. Unfortunately, Instapaper doesn’t provide any internal way to track or visualize your reading history just yet. Fortunately, it is easy to set it up your own tracking and visualizations. By either accessing its API with some code or using its integration with IFTTT, you can extract your entire reading history, including article read, articles liked and all of your highlights too.
Ultimately, this combination of a beautiful reading experience, highlights and tracking have made Instapaper my go-to app for reading articles now.
In this post, I want to explain what is Instapaper and how to set it up for tracking and knowledge management. I’ll share how to export your highlights locally, walkthrough a bit of code for data analysis, and show how you can use Google Sheets for cool and simple data visualizations too. At the end, in my conclusion, I share my dream for the next, most futuristic read-it-later apps.
Once we are done, I hope that you too will be ready deploy your own empowering article reading and learning system with Instapaper!
Instapaper: An Empowering Read-It-Later Tool
Setting up Instapaper is pretty straightforward. First create an account. Next, on your phone or tablet download and install the app, and on your browser, install the Instapaper browser extension. Instapaper has a good guide on all the ways to save links, including email, RSS and many other tools.
After you are setup, all you need to do is start saving links, and Instapaper will do the rest of the work. As links are saved, Instapaper will strip out the ads and give you a nice looking and consistent way to read. Whether or not I’m technically reading it later, I find that the Instapaper app and web version are both a much better manner to read online.
The main reason you want to the app and browser extension is to make it faster and almost thoughtless to save articles to read later. The objective is to build an automatic habit or routine when working on the web. Instead of getting distracted reading something new or interest in the moment, avoid the distraction and save it for later. By focusing in the moment and having good stuff to read later, you get the best of both worlds.
Obviously you can read articles directly as they come up, but the other reason to save articles is that it gives you a nearly complete record of the key articles you read throughout the day. This is part of Instapaper’s capacity to help you track your media consumption. Personally, anything I’m going to spend the time reading online gets saved into Instapaper. While I may not always read it in the app, I do my best to save and archive what I read once a day. This means nearly every important article I read online is captured and tracked. That way I have a decent record and count of my reading habits. We will look more at the tracking part shortly.
The other feature I love about Instapaper are highlights. Highlights are a way of marking up key passages and parts of something you are reading. All you have to do is select a passage of text while reading in the app or in the web version and select highlight. Highlight saved!
I use highlights in regular book reading on my Kindle and on PDFs too. Instapaper brings this ability to my article reading, so that as I read a part of an article that I find important or noteworthy, I highlight it. All of my highlights then get saved for me to use and reference later.
A number of apps today make it possible “highlight” the web, even Pocket now provides this option. I have researched and tried some of these tools, like Liner, but never found the experience very good across devices and systems. The big problem with Pocket’s highlight feature is there is no good way to get them out! You can highlight but you can only export them one by one. No integration with IFTTT and there isn’t even a way to get them from the API. Sad.
(NOTE: Instapaper only provides a limited number of highlights for the free version. So, in order to take advantage of unlimited highlights, you’ll likely need a premium account.)
The other nice thing about Instapaper is Search. If you are anything like me, then there is a good chance you regularly come across a number of interesting things to read but rarely have enough time to read it all. Moreover, finding good material doesn’t always mean now is the right time to read that material or topic. That’s where search in Instapaper can be super useful.
Basically by saving interesting material over time into Instapaper, you have an archive you can access later when you want to explore that topic. Instead of directly searching that topic, you can first search in Instapaper to see you already saved something on that topic. This makes it easy to find targeted material that you already noticed (and maybe even read and forgot about it), and then use them as a starting point for reading and learning more on a topic.
These are the core features I use with Instapaper. Worth mentioning if you are curious on other features are:
- Folders: These are specific areas that allow you to save articles to for later and provide more organization.
- Browse: This is Instapaper aggregator of great material found online. It is mostly a best of space. You can apparently link to twitter and facebook accounts to see and share what others are reading too.
- Speed Reading: This is a premium feature that will display articles word by word in high speed and can increase how fast you read. I’ve tried similar approaches in the past but never been a huge fan of reading like this.
Now that we’ve looked at how to install and use Instapaper, it’s time to dig into a customized setup that prioritizes tracking and learning.
Tracking Your Article Reading and Highlights with IFTTT and QS Ledger
Instapaper is great by itself, but it’s even more empowering when we customize and add a few more integrations to help us with tracking, visualizing and using what we read and highlight.
At present Instapaper doesn’t provide a direct way to visualize your reading trends in the app or on the website. This is unfortunate and would be a great feature to see sometime in the future. For example, it would be interesting to see my reading trends and habits and maybe clustered topics over time.
Fortunately, Instapaper does provide two excellent options to get your reading data for tracking and analysis purposes. Let’s look at these two options one by one:
Automated Article Tracking with IFTTT
IFTTT stands for “If This, Then That…” and is one of the most popular automation and integration tools available today. At its core, IFTTT enables you to connect two online services so they work together. For example, in the morning you might get a custom weather notification that it is going to rain today or be colder. You might create a workflow that posts to social media each time you publish a new blog post. Or save an instagram photo to a particular cloud service.
IFTTT has hundreds of integrations making it possible to have one app work and share information with another. For self-trackers and data freaks, it’s one of the easiest ways to get data out of one tool and into another. The most common example is take tracking data from something like Strava, Fitbit, Runkeeper and many others and log your data into a Google Sheet. So every time you complete a workout, the data is saved to a spreadsheet. I also use this same approach to log workouts into my calendar too.
Instapaper and IFTTT have a really great integration that makes it possible to keep a log of every article you save, read and like. You can also use it to save your highlights too.
Setting up and using IFTTT is really easy. First thing you need to do is create an account. After that, you need to connect different services. Finally, you need to create an integration workflow or recipe which IFTTT calls “Applets.” An Applet requires a trigger (the “If”) and a reaction (the “That”). For example, the trigger might be rainy conditions and the reaction might be to send you a text message or, if you wanted to track it, you could log it to a document.
For Instapaper, all you need to do is search for that service and connect it to IFTTT. After that, you’ll need to connect another service. The easiest and most reliable I’ve found is Google Sheets.
After you’ve connected both services, it’s time to create an applet. First select “This” and search for Instapaper and then choose one of its triggers. In this case, we will use “New archived item” which is when you finish reading an article. Second, select “That” and search for Google Sheets and then choose the option, “Add row to spreadsheet.” Now all you need to do is customize the title and spreadsheet location.
Here is what my final recipe looks like:
![]()
Now that our applet is ready, each time you read and archive something in Instapaper, you’ll have a record of it in Google Sheets. I recommend setting up similar workflows for Likes and Highlights.
Accessing Your Instapaper Article History using QS Ledger
IFTTT works great, but what if you don’t want to use a third-party tool or you already have saved articles in Instapaper?
In that case, the best approach is pulling your history directly from the Instapaper API. Instapaper’s API is quite well documented and easy to use. In this example we are going to show how to use Python and QS Ledger to get your reading history.
QS Ledger (short for Quantified Self Ledger) is an assortment tools for data collection and data visualization. It’s written and developed in python code using Jupyter Notebooks and currently aggregates and processes data from nearly 20 sources, including Fitbit, Apple Health, Google, RescueTime and many others. It can provide a starting point to analyze and visualize a life in personal data. It can be used to understand how you sleep, your exercise behavior, or how much time you spend on the computer or listening to music. It can also be used to pull data on what articles you read from both Pocket and Instapaper. Each project and integration includes a data downloader and data analysis notebook.
A tutorial on Python is outside the scope of this post. To get started, I recommend downloading and using the Anaconda Distribution. Then run Jupyter notebook and open up instapaper/instapaper_downloader.ipynb. This code will walk you through the steps need to use the Instapaper API and get your data!
After you’ve got your data, I recommend you checkout the Instapaper data analysis notebook which provides a good way to look at your reading history. Here are a couple of sample visualizations from my data:
![]()
As you can see a few words popup, Google Data Studio and Goals, two important themes I worked on in late 2018, early 2019. Cool!
Now that we’ve looked at two ways to get our reading history, let’s look at a couple other ways to visualize our data using Google Sheets.
Visualizing Your Article Readings and Highlights with Google Sheets
While not quite as powerful or flexible as Python or a targeting dashboard solution like Google Data Studio or Tableau, Google Sheets remains one of the best place to collect data and can be used to provide good visualizations too, especially once you are automatically collecting data using IFTTT like we are. Let’s look at how to modify the IFTTT Article Read Google Sheet to provide better process the data and starting doing some analytics.
Data Processing Your Instapaper IFTTT in Google Sheets
The first thing you are going to want to do is add headers to your Google Sheet. Depending on your setup, it may or may not have these.
Next add another header called “Timestamp” below the first row paste in the following code:
=arrayformula( if( len(A2:A), datevalue(regexreplace(A2:A, " at .+$", " ")) + time(regexextract(A2:A, "(\d+):"), regexextract(A2:A, ":(\d+)"), 0), iferror(1/0) ) )
Once you’ve added this, it should automatically update and extract the dates. You might need to to update it so it’s in date time format. If so, select that column and go into menu “Format.” Then choose “Number”and then “Date Time.”
What this code is doing is taking the information we got from IFTTT and cleaning it up so it’s a properly formatted field in Google Sheets. It does this by checking if there is any data to work with then doing some regular expression to get just the parts relevant to date and time. We are using an array function so it does this across the entire column and is updated each time a new row is added.
Now that we have a datetime field, it’s a good idea to create different time dimensions we can use to aggregate and visualize. Go ahead and create additional columns:
- Month
- Year
- Month-Year
- Day of Month
- Week Num
Then paste some code:
=arrayformula( if( len(A2:A), MONTH(E2:E), iferror(1/0) ) )
Replace MONTH with YEAR, DAY and WEEKNUM accordingly.
Because we may end up with multiple years, Month year will be slightly special so add this code instead:
Now that we’ve got data in Google Sheets and created time dimensions like month, year, month-year, etc. Technically, we can create charts and graphs without needing additional dimensions. But it’s better with them since we can use Pivot Tables.
If you don’t already know, Pivot Tables are a way to “flip” the data into aggregated summary tables. In order to create one, go into the menu for “Data” and select “Pivot Table” :
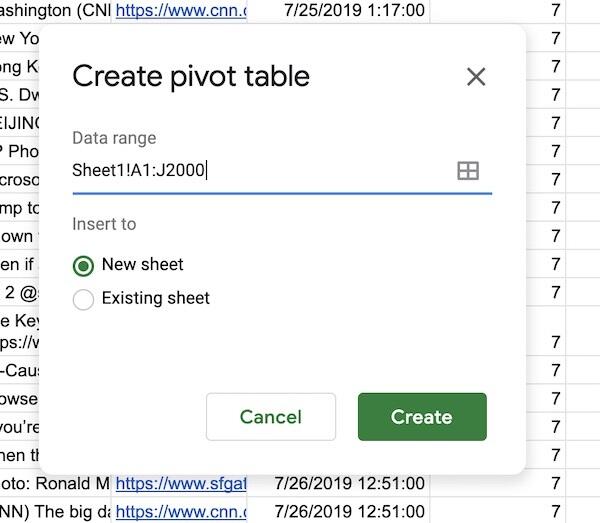
Be sure to update it to include additional rows. Otherwise your reports won’t update as new data is added. After hitting “Create,” you should be directed to a new sheet.
Now to complete your Pivot Table, go to the popup area on the right and add a Row (like Month-Year). Then add a Value (like Timestamp) and be sure to configure “Summarized by” to “COUNTA.” This will count the number of instances.
This should create a chart of articles read by month and it’s easy to add a chart now too:
![]()
You may need to use the filter function to exclude or only include certain dates. For example, I used the option to limit empty cells.
Depending on the dimensions you want to look at, you can create a pivot table by week or year. You could also add another dimension by hour of day and look at when you read article too.
Creating a Heatmap of Daily Articles Read in Instapaper
Obviously Google Sheets is primarily built to be a spreadsheet and it can’t do every kind of data visualization, but it can be tweaked to create a pretty nice looking heat map this this:
![]()
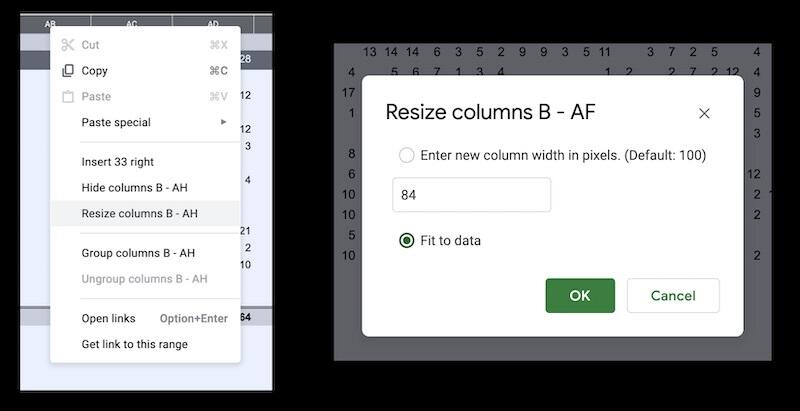
In order to create a heat map, clone or use your original month-year pivot table and add a column for day of the month.
This will create really wide table so first thing you should do select all the columns and then right click and use “Resize Columns.” I used “Fit to Data” but you may need to tweak to get it right the first time.
The next thing we need to do is add some styling. So select the various rows and then add borders and perhaps center the text.
The last step will be to use conditional formatting. Conditional formatting is a way to show gradients of color according to certain rules or formulas. Select all of the cells you want to color and then go to Format and select “Conditional Formatting.”
I used the option “Color Scale” and configured it to use a gradient and set my midpoint with Percentile 30. You may need to adjust it depending on your data. The goal should be to highlight peak reading days and days with low or now reading being white.
That’s it. You now got a heat map showing your article reading for each day of the month. Bravo!
How to Export Your Article Highlights into Local Files
What we want to do is take our stored highlights (from the API or Google Sheets) and make them accessible for our studying and writing. This is the last step for us in augmenting our read-it-later usage experience with Instapaper. This step takes our highlights and moves them into a format we can use for learning and creating.
While highlights are nice by themselves, a good deal of research shows that highlights by themselves aren’t a very good approach to learning. As Dunlosky shows in “Strengthening the student toolbox” (2013), highlights and re-reading just aren’t the most effective ways to learn, and, in fact, they can be problematic, because the instill the illusion of competence. Basically by re-reading and highlighting you get the impression of having learned when the reality is you haven’t.
According to the science of learning, there are several better ways to learning. One of my favorites is a form of elaboration and is quite similar to the Feymann Technique. Basically as I read and learn new things, I take notes. These aren’t ordinary scribbled ideas in the margins or your study notes. Instead these so-called “Smart Notes” are the effortful practice of internalizing a concept and expressing it in your own words in writing. Ideally, you reference where it came from, include an example or two, and link it with other related notes. I find this to be a great practice if knowledge and learning are important to your work.
Now what to do with our highlights? Even though highlights by themselves aren’t enough for learning, they are a great way to get started.
The only problem: How to get these highlights out of Instapaper?
There are a few options. One way would be to setup an IFTTT recipe that pushes highlights into a notebook like Evernote or even Google Docs. Additionally, we can use the API directly to pull highlights or pull them out of Google Sheets.
In QS Ledger there is a special script called gs_instapaper_highlights.ipynb that can serve as a bridge between our spreadsheet of highlights and our local notes. In that script, all you need to do is configure the spreadsheet name and where you want your highlights exported. Then when you run the script it’ll create a separate markdown file for each article.
The exported files each have the basic article info and all of your highlights.
While you can run this using Jupyter Notebook, the easiest and faster way is to run it in the command line with a command like this: jupyter nbconvert --execute instapaper_highlights.ipynb. Personally, I’ve create a crontab task that runs this hourly as well as an alfred script I can use too.
The end result is that I now have all of my highlights stored locally, and it provides a quick and dirty way to get the necessary info I need on most articles I’ve read.
It’s also a rather seamless experience now to pull up recent articles and their highlights and start creating my own learning notes. Highlight might not be the best method for learning, but they are an excellent way to start creating your own elaborative notes, which are.
Conclusion: A Dream for the Next Futuristic Read-It-Later App
Read-it later apps appeared years ago as way to deal with problem of finding something great to read online but not wanting to get distracted and off-topic in the moment. So you save it to read it later. Various tools like Pocket, Evernote and Instapaper solve this problem and many browser can provide similar functionality. They help you save links and provide a better experience for reading by removing the ads.
In this post we looked at my favorite read-it-later tool, Instapaper, which is not only a great basic article reading tool but has a few special features that make it even better. Namely, Instapaper provides the capacity to track what you read and use that data to see trends over time. This is easily accomplished using its integration with IFTTT or with its API and some coding. Additionally, Instapaper allows you to highlight parts of the articles you read. You can then export those highlights too. This combination of features (reading, tracking and highlighting) makes it an excellent tool of choice for anyone looking to augment their digital memory and article reading, especially towards learning and creation.
To put it another way, unlike many apps, Instapaper provides an example where technology can be used to support better focus and improved learning. By applying some spreadsheet or data science skills, we can become more aware of how and what we read. We can also create some interesting data storytelling about our reading behaviors too.
For example, I’ve used Pocket, Kindle, GoodReads and Instapaper over the years to essentially track nearly everything I read and use. These tracking stats and visualizations have changed how I quantify my habits and empowered a tighter learning cycle between what I read and the smart notes I create.
Overall, I’m quite happy with my current article reading and tracking setup, but being a reader of sci-fi and future thinking scientists, I can’t help but wonder: What else might these reading apps become one day?
Right now these read-it-later apps are essentially productivity tools. They largely improve the experience of reading online articles, and they help you remember something to read later and look up what you read before. They are by no means “smart” or “intelligent” and they aren’t particularly personalized either.
If we want to improve the future of our reading and learning apps, the first step is to infuse them with a degree of personalization. In his book, “The Inevitable,” Kevin Kelly writes about the role of technology in human lives and society in the future, including tracking, screening, flowing, etc. One stands out when it comes to a future reading app and that’s filtering.
According to Kelly, we filter by gatekeepers, by intermediates, by curators, by brands, by government, by our cultural environment, by our friends, and by ourselves. One big on is Google. “Google is the foremost filterer in the world, making all kinds of sophisticated judgments about what search results you see. In addition to filtering the web, it processes 35 billion emails a day, filtering out spam very effectively, assigning labels and priorities. Google is the world’s largest collaborative filter, with thousands of interdependent dynamic sieves. If you opt in, it personalizes search results for you and will customize them for your exact location at the time you ask.”
What Kelly imagines is an alternative form of personalized filtering. Using a combination of artificial intelligence, our history, and even specified parameters, he foresees that even greater personalization and tailoring of this filtering. He postulates that there will services and bots you use to make this happen. The AI going out a finding relevant information and even processing it too. For example, I’d love for my reading app to look at my reading trends and recommend related content on these subjects. It might see that I’m struggling to learn something and advice me to check out one of the best guides about a certain aspect.
This kind of advanced, AI-powered filtering might take time to arrive. If you imagine the computational resources spends on its search function and then think about scaling that to a single human, you start to realize the size of the problem.
Fortunately some simple that could be added would be clustering of articles and topics. After reading thousands of articles and books over the years, it’s unfortunate that I can’t go beyond word clouds to visualize these trends. What I would like to see is a smart clustering showing past, present and future articles and content on areas I’m reading and learning.
One other area I’d like to see my reading apps improve upon is acting as a closer guide to my learning. I’ve been thinking about this on my podcast tracking service as a gap between listening to a great podcast and failing to use it effectively for learning. One step might be quizzes and follow up questions. But it seems obvious that when we use these reading tools, it’s likely because we value that information towards a creative or learning goal. So the question becomes how can these podcast and article tracker help us to learn better?
The last component for a better reading app would be “intelligence.” The current tools are for productivity, but the future ones might take inspiration from the sci-fi writer Neal Stephenson’s book, The Diamond Age (2003). The book is a wonderful combination of story and futuristic thinking with one of its chief characters being a special kind of book called “A Young Ladys Illustrated Primer,” which was intended to educate a girl to think for herself. The book has artificial intelligence and a real agent that guides the girl through a number of immersive, learning challenges. Originally developed for an upper class baron, the inventor decides to smuggle out a copy and share it with someone in the lower class. Ultimately the hope is to bring more access to education to everyone, but strikingly it’s also an amazing example of how to think about our own learning and reading apps.
While the next evolution for read-it-later apps might be targeted recommendations and better visualization of our reading history, personally my future dream is for much more: a personalized filter of great content, an intelligent reading buddy that can nudge me to read the right things at the right time, and hopefully one day an interactive guide to tailored content and challenges so I too can think for myself.
References:
- Dunlosky, J. (2013). Strengthening the student toolbox: Study strategies to boost Learning. American Educator.
- Kelly, K. (2016). The Inevitable.
- Stephenson, N. (2003). The Diamond Age. Spectra.